How to Enter Your Account Information
Shipedge allows you to personalize your account based on your business requirements.

Click on the My Account tab in the main menu and select “Preferences.”
Main User Profile setting

On the Main User Profile screen, click on the “Edit” link (1). Enter your company’s information and then click “Edit” when you are done.
Note: Shipedge allows you to enter your company’s logo at the bottom of this page. When this is done, your logo will appear on all Shipedge’s screens as well as the packing slips in your orders.
User Accounts

This screen will allow you to enter several user accounts and grant area-visible access settings for each user on your company. (So if you want one user account to access just one part of the software, you can do that here.)
Communication Settings

Shipedge has all communication alerts turned on by default.
Notification Types:
- Replenishment On = You will receive an email as soon as our warehouse team finishes receiving/replenishing your company’s shipments.
- Warehouse Created a SKU in your inventory On = Pretty self-explanatory
- Return By Carrier On = You will receive an email when an order is sent back to us by the carrier.
- Restocking ON = You will receive an email when our warehouse team processes a return
- Billing Adjustment On = Any non-standard charge such as man-hour charges
- Inventory Correction On = Any recounts in your current inventory
- API information = Errors during integration sync and order-fetching process
- Payment & Billing = Updates regarding your billing configurations and settings
- Discontinued SKUs = If you or someone in your group discontinues one or multiple SKUs
Communication Templates

The basic communication or notifications templates are:
- Packing List
- Shipping Notification
- Backorder Notification.
You can paste any HTML or simple text into these boxes, and we will send them as emails to your customers. Notifications include a section in the middle (between header and footer) where we will insert a tracking number or order number and SKUs involved.
– Feel free to test these until you get them just how you want them.
Inventory Forecasting & Alerts Setting

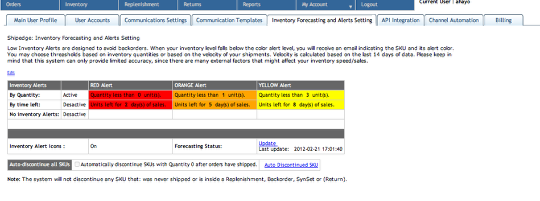
- Forecasting is a powerful feature in Shipedge, allowing you to track the Velocity of Sales for each SKU. It will then determine how many days left of each particular item you have remaining based on regular daily sales.
- You can receive alerts based on number of selling days left or based on quantity left. You will also be able to activate icons for your Inventory view.
- Auto-discontinue is a feature for customers who don’t restock their product.
NOTE: These settings apply globally to all of your account’s inventory. That being said, there are ways to set these up for specific groups of inventory. For example, you can have different rules for replenishing products from one supplier to another (Forecasting by Supplier). The Auto-discontinue feature can be activated for certain products by converting them to one-time products inside Shipedge > Inventory > Edit Attributes . (More details in other sections.)
API Integration
The API integration area includes our API’s full documentation. This section is mainly intended for your developer.
Channel Automation
Shipedge can integrate with multiple channels at the same time. Each channel will have its own communications templates and settings.
– Learn more about this section in our integration tutorials
Billing Information Setting

Shipedge Billing has two main sections:
- Auto-increment: Where Shipedge can add a specified amount automatically on your behalf when funds fall under certain amount.
- Auto-pay: This means that as soon as your statement is generated, Shipedge will charge the amount due to your account.
NOTE: Activating one of these features is required to attain a line of credit in ShipEdge. Inventory levels and a good track record help the bank determine the line of credit amount to each specific account.
