How to Set Up Commerce7
TABLE OF CONTENTS
- Commerce7 steps
- Shipedge steps
Commerce7 steps
- Sign up for an account with Commerce7. You need to save your Username and Password.
- When a new account is created you get assigned a Tenant name that can be found in Settings General. You will use that to integrate with Shipedge.

Shipedge steps
- Login into your OMS account from Shipedge.
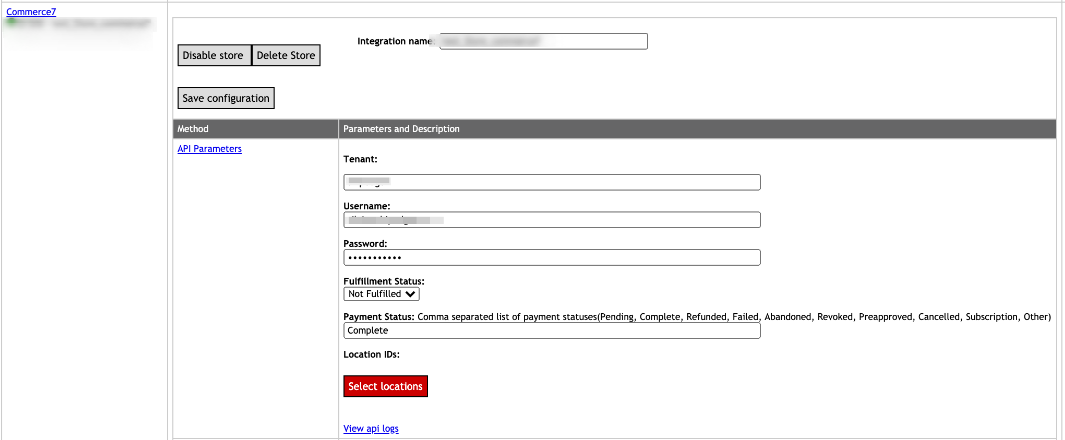
- Browse to My Account > Preferences > Channel Automation and look for Commerce7 integration.
- Choose how you would like to name your store and click Add new store.

- Enter the Tenant name that was provided when you created your Commerce7 account.
- Provide your Username and Password for your Commerce7 account.

- You also need to select the Fulfillment status as Not Fulfilled and Payment status (e.g. Paid, Pending) Important
- Check Orders and Update tracking. Click on Get Orders! to get data from Commerce7

- Update inventory.
- ****We highly suggest you do NOT check these two boxes in the Update Inventory section until your SKUs have been received into the Warehouse Management System. This will prevent any discrepancies in your inventory quantities on Commerce7 Store.

- ****We highly suggest you do NOT check these two boxes in the Update Inventory section until your SKUs have been received into the Warehouse Management System. This will prevent any discrepancies in your inventory quantities on Commerce7 Store.
- Click Save configuration. Click on the Save Configuration button above the API parameters section.

- Address Verification, Residential Check, and Ship Method Translator.
- Hover on the Orders section and then select Integrations. Then, look up the Commerce7 integration name you set up before.

- Click on the tool icon and check the Address Verification & Residential Check.

- Ship Methods and API Errors.
- As this is considered a new integration some orders may initially come in with an API Error. As they do please be sure to map the ship methods to prevent errors on future orders.
You can also map the Ship Methods by clicking the Checklist Icon and then selecting ShipMethod Translator.
- As this is considered a new integration some orders may initially come in with an API Error. As they do please be sure to map the ship methods to prevent errors on future orders.
- Hover on the Orders section and then select Integrations. Then, look up the Commerce7 integration name you set up before.
- Congrats, The integration setup is now completed.
