Uploading Images: OMS, WMS Logo & SKU Images
Introduction :
This article explains how to upload images on the Shipedge platform for OMS, WMS, and SKUs.
- The OMS logo:
- This is the one that appears on the top left corner of the OMS account. This is the logo that represents the client.
- Allowed Formats : .jpg , .png
- Max file size : 200kb
- Suggested size: 300 x 100
- How to upload an OMS logo.
- Log in to your OMS account.
- Hover over My Account and click on Preferences.
- Select Main User Profile.
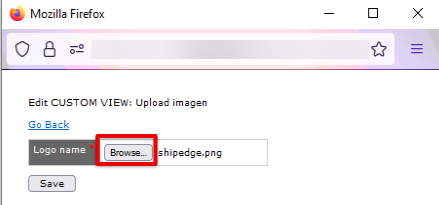
- Click on Edit logo.
- Click on browse and select the image logo you want then click on save
.
- This is the one that appears on the top left corner of the OMS account. This is the logo that represents the client.
- SKU Image
- This is the Image that represents an SKU in the OMS System.
- Allowed Formats : .jpg , .png
- Max file size : 500kb
- How to upload an SKU image.
- Log in to your OMS Account.
- Select Inventory.
- Click on the three dots placed on the left side of the SKU row.
- The SKU details chart will be available, go to the bottom of the page and click on Add Image.
- Click on Browse and select an image that matches with the requirements. And, click on Upload Image.
- This is the Image that represents an SKU in the OMS System.
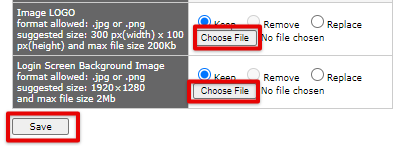
- WMS image upload (this is the image logo and the login screen background image)
- The login screen background image is a large image that appears on the login portal of all the order management systems linked to WMS.
- Allowed Formats : .jpg , .png
- Max file size: 2Mb
- Suggested size: 1920 × 1280
- The image logo is a small image that appears on the login portal. It represents the warehouse.
- Allowed Formats : .jpg , .png
- Max file size: 2Mb
- Suggested size: 1920 × 1280
- How to upload an image logo and a login screen background image:
- Log in to your WMS platform. Hover over System Config and click on Preferences.
- Click on the Main User Profile and then on the edit option.
- New option will be available, go to the bottom of the page you will find the images configuration section.You can choose three actions Keep, Remove or Replace. To add a new image select Replace click on Browse and select the images that matches with the requirements. Once done please Save your configuration
.
- The login screen background image is a large image that appears on the login portal of all the order management systems linked to WMS.