Using The My Account Tab
Using The My Account Tab

1. My Account – Takes you to your My Accounts page which is shown below. This page has 5 main options in your account. They are listed with large icons and text.
2 & 12. Shipping Estimates – Input your package destination and dimensions to see your different shipping options and prices.
3 & 8. Preferences – Your account preferences.
4 & 9. Change Password – Allows you to change your account login password.
5. Statements – A list of past and current statements linked to your account.
6. Payments – A list of all payments made by your account.
7 & 11. Disputes – A list of all past and current disputes.
10. Invoices – Your account invoices.
12. Shipping Estimates –
Preferences Page – Main User Profile
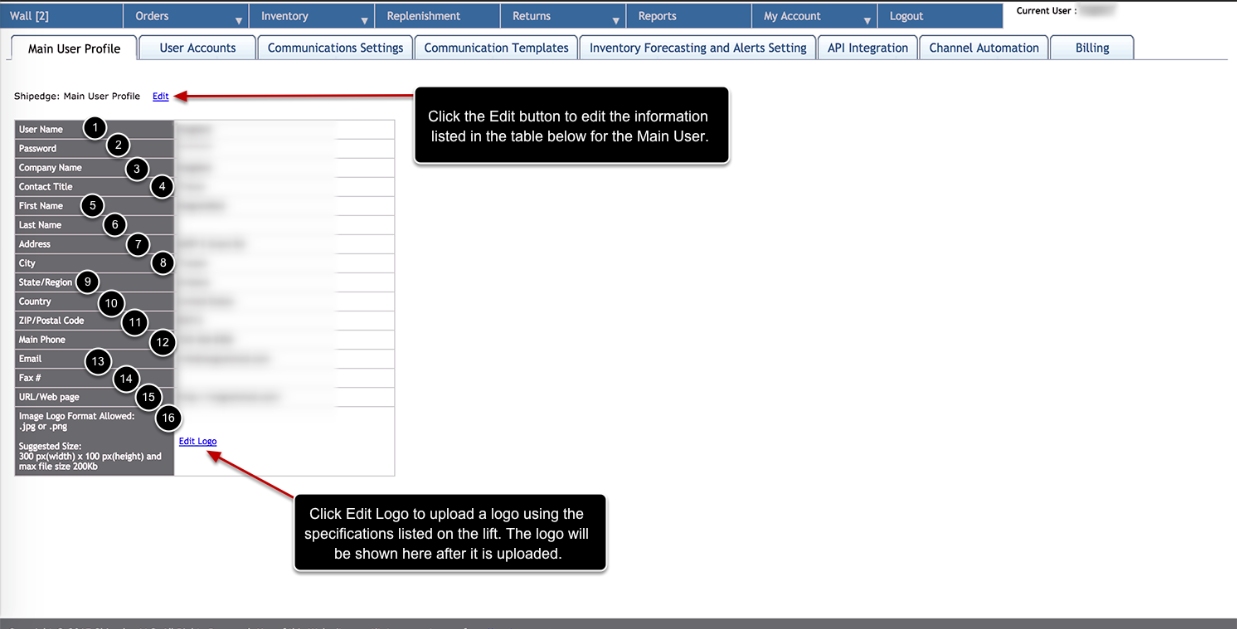
The Main User Profile tab in the Preferences section is where you will go to see and edit your main user account settings and information.
1. User Name – The login username for the main account.
2. Password – The login password for the main account
3. Company Name – The company name for the vendor account.
4. Contact Title – The professional title of the main user for the vendor account (example: CEO, etc.).
5. First Name – The first name of the user for the main account.
6. Last Name – The last name of the user for the main account.
7. Address – The address of the office of the business for the vendor account.
8. City – The city of the location of the office for the vendor account.
9. State/Region – The state/region of the location of the office for the vendor account.
10. Country – The country of the location of the office for the vendor account.
11. Zip/Postal Code – The zip code or postal code of the location of the office for the vendor account.
12. Main Phone – The main phone number for the contact of the vendor account.
13. Email – The main email address for a contact of the vendor account.
14. Fax Number – The fax phone number for the contact of the vendor account.
15. URL/Web Page – The URL or website address for the vendor.
16. Image Logo – An image logo of the Vendor company. Click Edit Logo and follow the instructions to add a logo. The logo will display in the top left-hand corner of your account and on any packing slips.
There is an Edit button at the top which can be clicked on to edit any of the above information that is listed on this page.
Preferences Page – User Accounts

The Users Accounts tab in the Preferences section in Shipedge is used to keep track of all users. For example managers, assistants, or employees. This is where you can create and edit those users.
1. User’s Email/Login – The user’s login email address.
2. Password – The user’s login password. (Or a temporary password for the first login).
3. First Name – The user’s first name.
4. Last Name – The user’s last name.
5. Active – If the user’s account is currently active. Either a Y for Yes or N for No.
The next few cells are checkboxes symbolizing if the user has access to certain views.
6. Orders View – Access to the orders views within Shipedge.
7. Inventory View – Access to the inventory page within Shipedge.
8. Inventory Export – Ability to export inventory/products from Shipedge.
9. Replenishment View – Access to the replenishments page within Shipedge.
10. Returns View – Access to the returns page in Shipedge.
11. Reports View – Access to the reports page in Shipedge.
12. Orders Data Download – Ability to download order information from Shipedge.
13. Statements – Access to the statements page in Shipedge.
14. Edit – The button to edit the user’s account information and access rights.
15. Delete – The button to delete the specific user’s account.
Preferences Page – Communications Settings
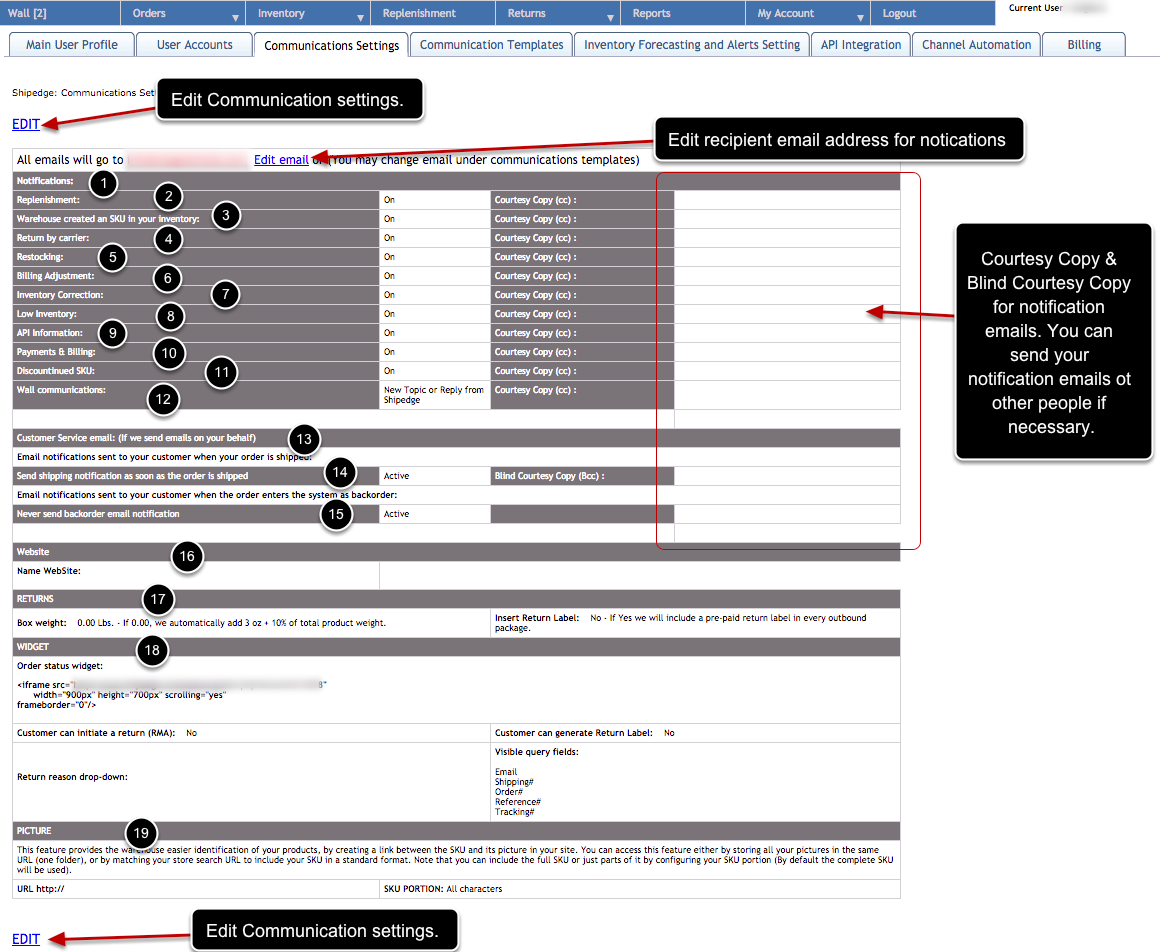
The Communication’s Settings tab within the Preferences section in Shipedge is used to edit your communication emails and notifications. This is where you choose who will receive what information.
1. Notifications – Choose which notifications YOU would like to receive. These emails will be sent to the email address in red, which you can edit.
You can also include Courtesy copy emails in the right column if you wish to CC any other members of your team.
2. Replenishments – Receive notifications whenever there is a new replenishment associated with your account.
3. Warehouse Created A SKU In Your Inventory – Receive an email when the warehouse creates a new SKU in your inventory.
4. Return By Carrier – Receive a notification when you get a return from the carrier.
5. Restocking – A notification email is sent when there is a restocking associated with a product associated with your account.
6. Billing Adjustment – A notification email that is sent whenever there is a billing adjustment made to your account.
7. Inventory Correction – A notification email can be sent whenever there is a correction associated with your inventory.
8. Low Inventory – Notification email sent when your vendor account is put in low balance (All orders are put on hold until new Funds are added to your account when in Low Balance).
9. API Information – Notification email with API information.
10. Payments & Billing – A notification email is sent whenever there are changes or updates related to payments and billing with your vendor account.
11. Discontinued SKU – A notification email is sent whenever there is a discontinued SKU that is associated with your account.
12. Wall Communications – Email notification that is sent whenever there is a new reply or topic that is associated with your account in the Shipedge Wall.
13. Customer Service Email – Email notifications are sent to your customer when their orders are shipped. This is only if we send emails on your behalf (Should be turned off if your selling channel automatically does this).
14. Send Shipping Notification As Soon As The Order Is Shipped – This will send a notification email to your customer when their order is shipped. Can also include a blind courtesy copy email address.
15. Never Send Back Order Email Notification – This can be turned on if you do not want your customers to receive any emails if their orders are in backorder status due to low inventory.
16. Website – The website name or URL of your company which is included in certain emails.
17. Returns – This can be turned on for Return Labels, if it is active we will include a pre-paid return label in every outbound package.
18. Widget – A widget that can be given to your customers that shows the order status. This code can be placed within an email or website which shows the status of orders depending on the shipping number and other order information. You can select whether a customer can initiate a return or return label through the widget as well. You can also edit the visible query fields that are shown in the widget.
19. Pictures – This is where you include your photo folder for SKU pictures if you wish for your SKUs to have pictures for the warehouse to be able to have an extra identification step when necessary (for example: if the barcode is missing or fell off for some reason).
Preferences Page – Communications Templates
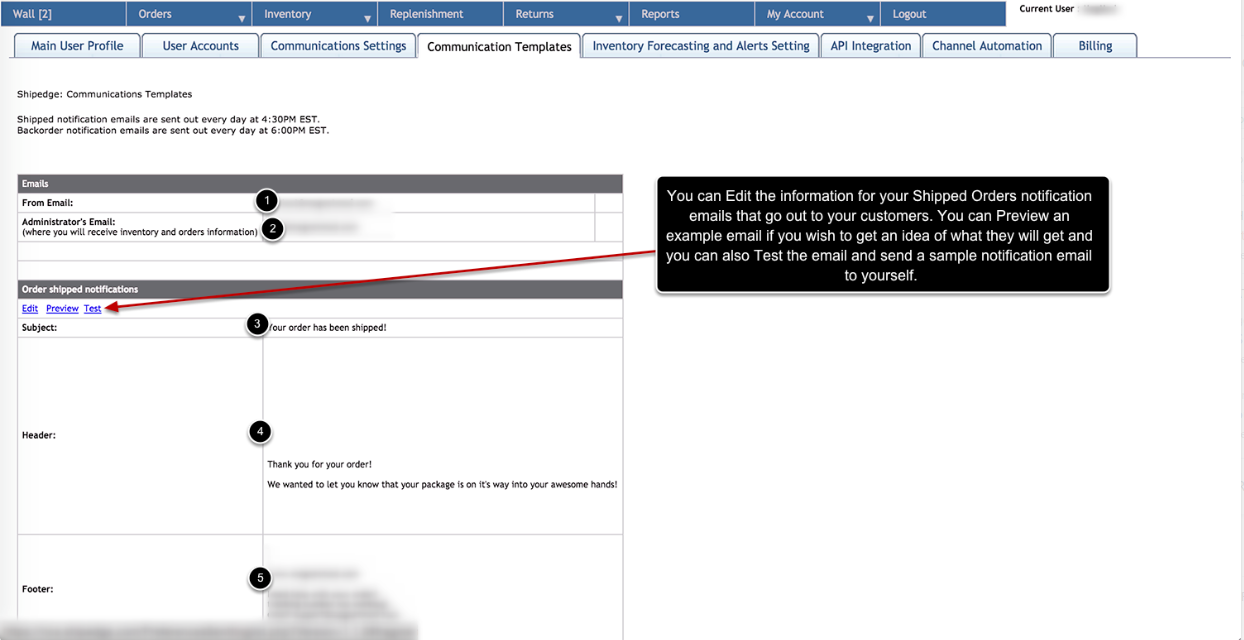
The Communications Template tab is where you will edit and create your shipped orders notification emails. These go to your customers when the Warehouse ships their orders. You can Edit, Preview or Test the email after you have created the necessary parts of the email. In order for this to work correctly you must fill out the From Email, the Administrator’s email, the Subject line, the Header, and the Footer. If any part is missing the communication email will not be sent out.
1. From Email – This will be the email that will appear as the sender of the notification email to the customer.
2. Administrator’s Email – This is the admin email that will receive inventory and order information. This will not be an email that the customer will see.
The actual email that will be sent out is created by filling out the information below in the lower table:
3. Subject – The subject line of the email that the customer will receive.
4. Header – The header that will be included at the beginning of the email that the customer will receive. This will go before the actual order information.
5. Footer – The footer that will be included at the end of the email that the customer will receive. This will go after the actual order information.
Preferences Page – Inventory Forecasting & Alert Settings
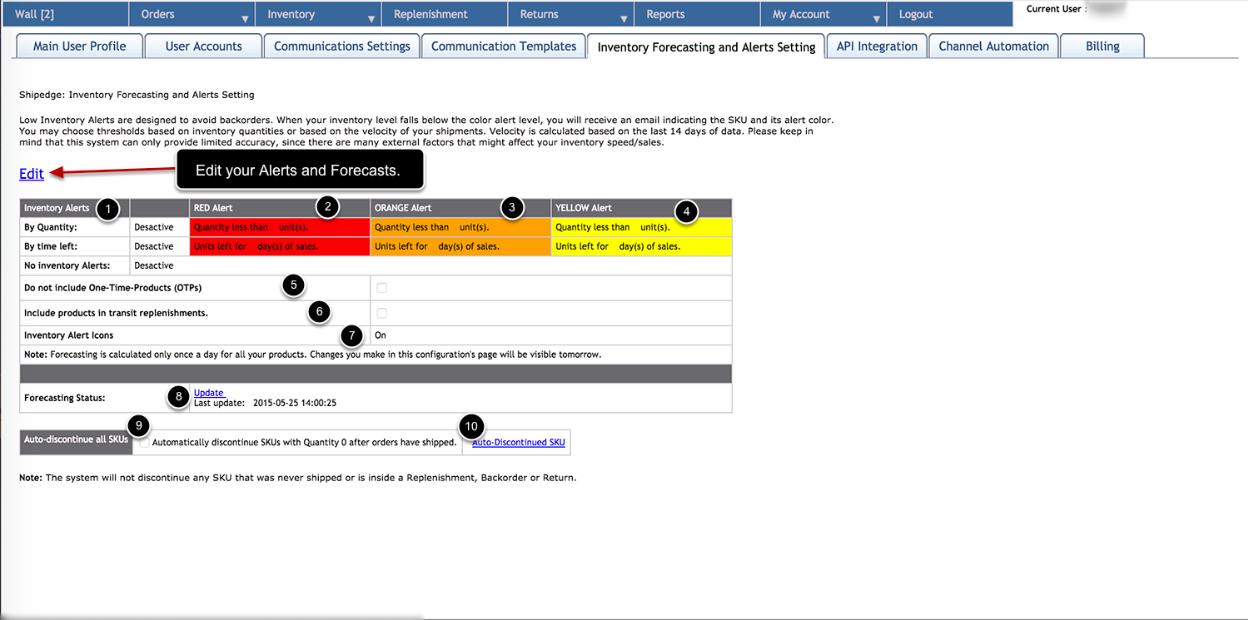
The Inventory Forecasting and Alerts Setting tab within the Preferences section in Shipedge is probably one of the most powerful features that is available to vendors within Shipedge. This is where you will go to setup your forecasting and alerts settings.
1. Inventory Alerts – The first table in this page is the actual setup for your three levels of alerts. The alerts can be setup by quantity or by time left in days. You can also activate or deactivate the alerts all together if you’d like.
2. Yellow Alert – The first alert that you will receive when getting close to low inventory.
3. Orange Alert – The second alert that you will receive when getting to low inventory.
4. Red Alert – The third and final alert that you will receive when getting to low inventory.
5. Do Not Include One-Time-Products (OTPs) – This checkbox can be checked to include One-Time-Products. These are products that you may only sell for a limited time (promotion, clearance, etc.). Check this if you are not worried about running out of inventory for OTPS.
6. Include Products In Transit Replenishments – This checkbox can be checked to include your in transit replenishments and count it as your on had inventory.
7. Inventory Alert Icons – This will let you know if you have Inventory Alert icons on or off.
8. Forecasting Status – The forecasting status row will let you know the last time the forecast was updated and has a link “Update” which you can click on to update your forecasting.
9. Auto-discontinue All SKUs – This checkbox allows you to automatically discontinue SKUs with quantity of 0 after orders have shipped. This is to remove any SKUs that you may no longer be offering.
10. Auto-Discontinued SKUs – Clicking on this link will take you to a page of a list of all discontinued SKUs.
*Note: Shipedge will not dicontinue any SKU that was never shipped or is inside a Replenishment, Backorder or Return.
Preferences Page – API Integration

This is the page that you would go to to get your API credentials for Shipedge after you request access if you wish to import your orders into Shipedge using our API.
You must request access to it through your fulfillment/warehouse partners to get your own personal credentials to begin using the Shipedge API.
Afterwards this page will change and have your credentials as well as directions on how to proceed with using the API.
Preferences Page – Channel Automation
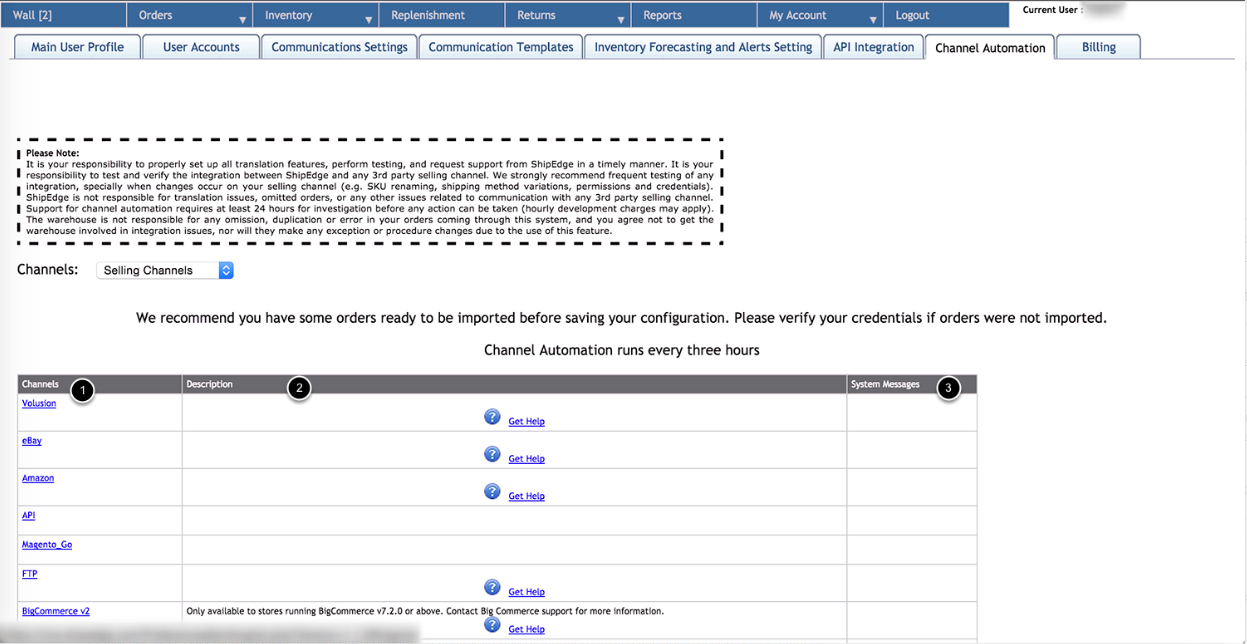
The Channel Automation tab in the Preferences section in Shipedge is a very important section for vendors since this is where you will go to integrate your separate selling channels to communicate with Shipedge and import orders into the Shipedge system as well as exporting the tracking numbers back to the selling channel if necessary. We currently offer integrations with a variety of selling channels and cover the major ones as well as a few lesser known yet also used selling channels. We include a Get Help link to each selling channel which walks you through step by step on how to integrate and configure your selling channels with Shipedge. If you need any additional help please feel free to contact the warehouse/fulfillment team to assist you with this process.
1. Channel – The channel name. Can be clicked on to open up the integrations/configuration options for that channel.
2. Description – This is where the integrations and configuration options will appear after you click on a certain channel. It will include the necessary methods that you need to configure, a parameter and description of each and some action buttons that are self explanatory for requesting certain actions such as “Grant Access to your #### account“, “Get Orders!” or “Update Now!” which each have their own tasks. The different options for configuration are:
- API Parameters – This is where you will enter your API credentials or information which vary depending on each channel and is what the Get Help button will help walk you through setting up.
- Orders – This option is to get automatic orders synced into Shipedge. There is also a button “Get Orders!” which updates your orders at the time of clicking it from your channel into Shipedge (This option can only be run once every hour).
- Update Tracking Number – This option is to automatically update and export the tracking numbers for shipped orders from Shipedge back to your customers in that channel.
- Update Inventory – The two options within this row are “Sync SKUs” and “Sync SynSets” which do just what they say, it automatically syncs your inventory listings from your channel into Shipedge. You can also “Sync External Items” which syncs quantities from external warehouses or “Add alternatives” which adds quantities of alternatives to certain items. You can click the “Update Now!” button to instantly update your inventory the moment you click on the button.
- Store – The store name that you give to that channel.
- Disable Store – Used to disable the store. This will still keep the channel information saved incase you wish to enable it in the future.
- Delete Store – This is used to actually delete and disable the store so that all the channel information is removed from Shipedge. Only use this if you are sure you will no longer use this channel in the future as you will have to redo the configuration if the channel is deleted.
- Insert New Store’s Name – This text box is used to add a new store name if you wish to add a new store to that channel.
- Add New Store – Click this button after you have named your new store for that selling channel and it will create a new store for that channel where you can configure the channel using the above options we went over.
3. System Messages – This column has the option to “Save_configuration” after you have created a new store for a certain selling channel or edited any of the integrations and configurations settings.
Again, if you need any assistance to setting up any of your channels use the “Get Help” button first which will create a popup with step by step instructions into configuring and integrating the necessary information required to get that specific channel to work with Shipedge. Each channel is different and so the channels have their own unique steps to configure. If you still have any doubts or questions feel free to contact the warehouse or fulfillments center team who can assist you with the configuration.
Preferences Page – Billing (Auto-Pay)
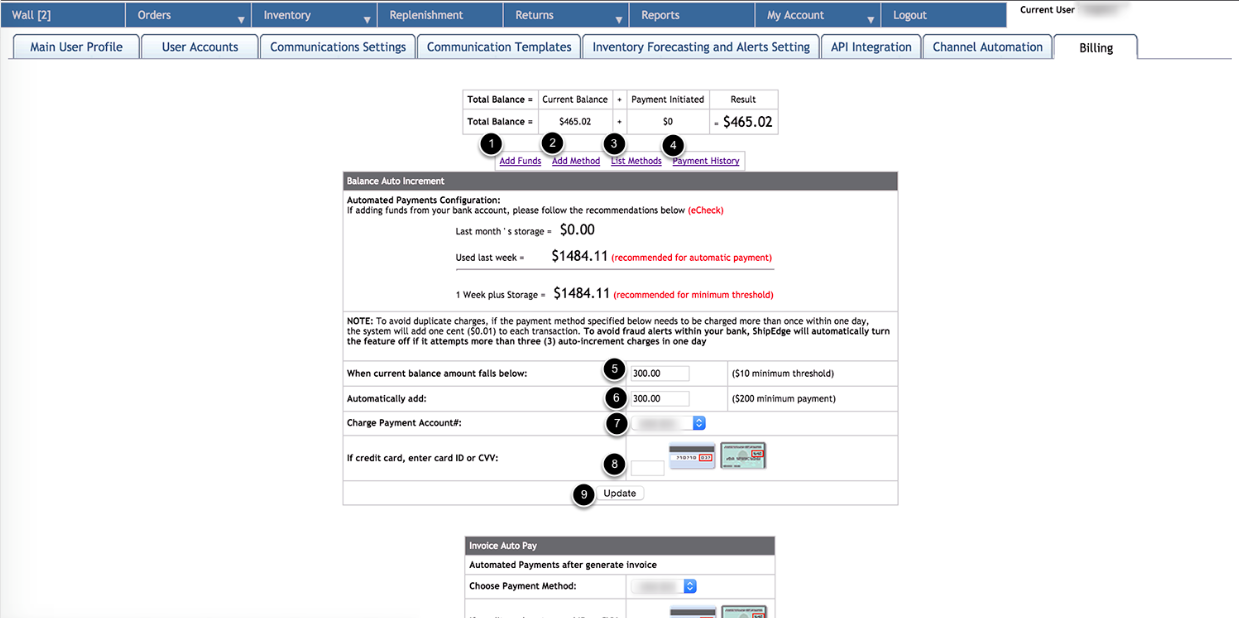
The Billing tab within the Preferences section in Shipedge is used to set up Auto Pay within your account which automatically deposits funds to your account when it is reaching a certain level that you set up so that you never go into a negative or low balance, which causes your orders to be put on hold until you add more funds. You can also add more Payment methods through this page or Add Funds one time through your already created payment methods that are set up with your Account.
1. Add Funds – Click on this link to get taken to the one-time Add Funds page where you will choose a payment method to add a certain amount of funds to your account.
2. Add Method – This link will take you to a page where you can add a new payment method by entering in the payment method owner information, billing address, and payment method information such as Credit Card info or Checking account info.
3. List Methods – List all payment methods that you currently have available on your account.
4. Payment History – This link will take you to your payments page within the My Account tab in Shipedge where you will see a payment history of all past payments made through your account.
Below that is a table where you see and activate auto-payments so that your account always adds funds automatically from your payment methods when it starts getting low on funds, thus preventing your orders from ever being put on hold for being in low balance.
5. When the Current Balance amount falls below – This option is your balance minimum which you can set up as anything above $10 which will trigger your funds to be added from the payment method you select automatically.
6. Automatically Add – This is the number of funds that you will add to your account automatically when the trigger is activated and your funds fall below the minimum acceptable balance. A $200 minimum is required for this field.
7. Charge Payment Account Number – This is the payment method that you will use to automatically add funds to your account. This is a drop-down menu of all current payment methods that you have set up with your account.
8. If Credit Card, Enter Card ID or CVV – This is set up for security purposes in which you must enter the security code on the credit card in order to be able to set up automatic payments. We do this just to ensure that the owner of the credit card is making the decision to automatically charge the credit card even if the balance reaches the minimum acceptable balance.
Change Password Page
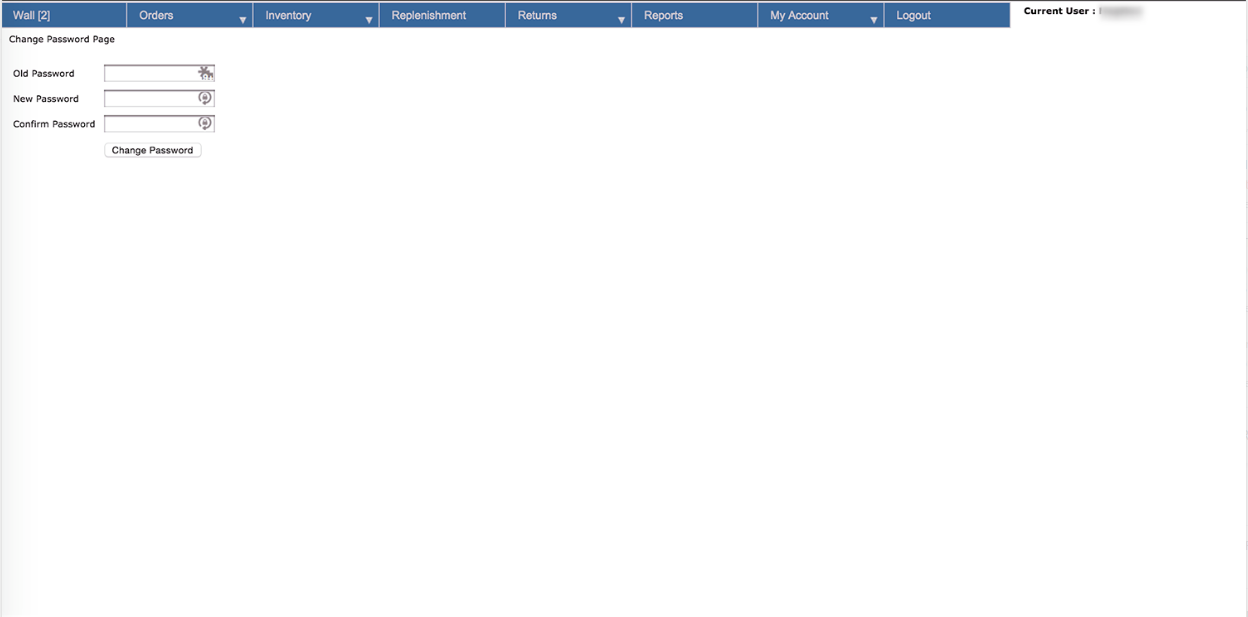
The Change Password page in the My Account menu in Shipedge is very straightforward and should only be used when you wish to change your login password for your account.
Shipping Estimates Page
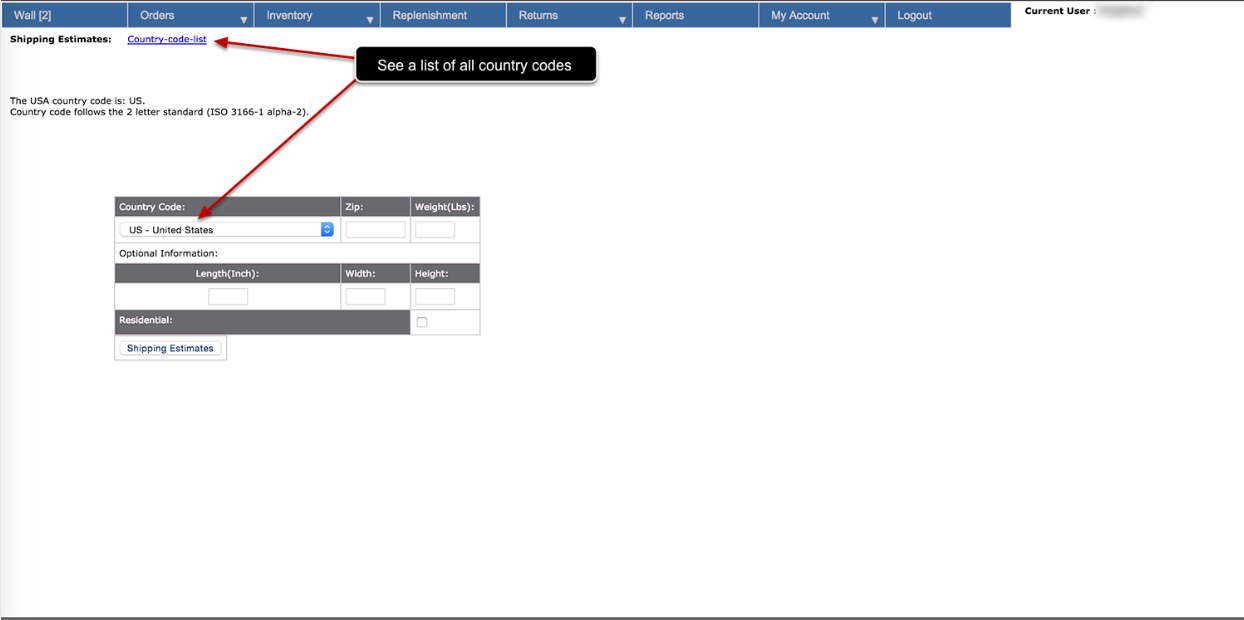
The Shipping Estimates page within the My Account tab in Shipedge is used to get an idea or estimate of the different shipping methods available.
It’s very straightforward, just fill in the information and a list will populate.
Statements Page
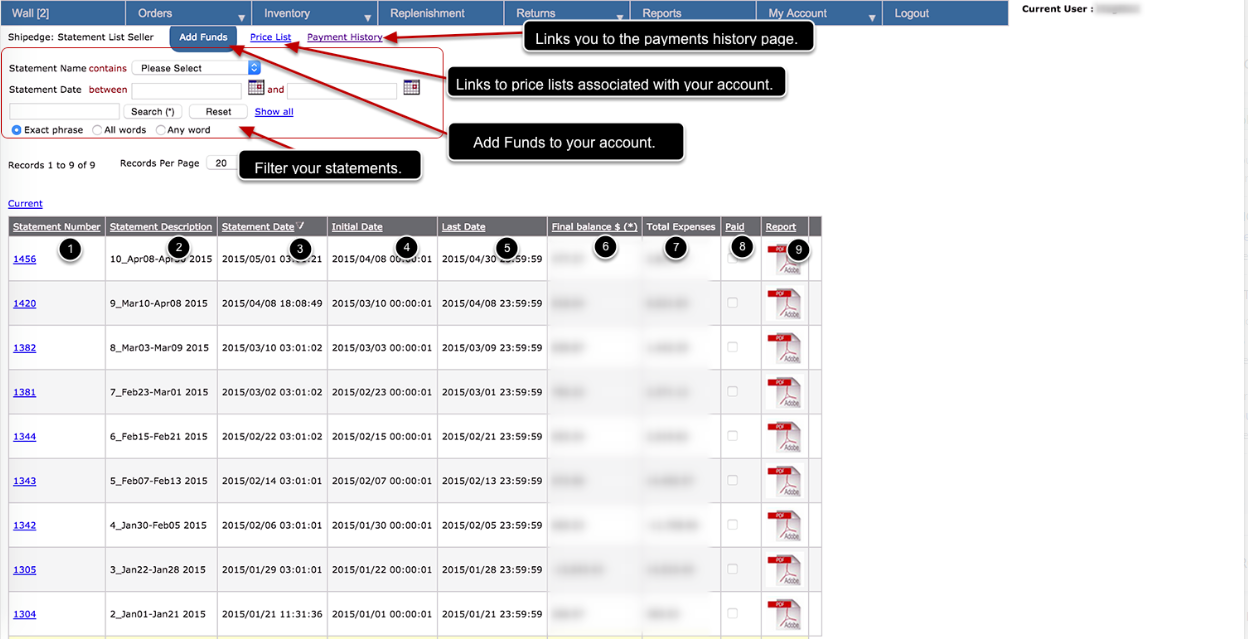
The Statements page within the My Accounts tab in Shipedge is used to view all statements that are associated with your account and keep track of everything for your own records. The statements can be downloaded in PDF format.
1. Statement Number – The number of the statement. This number can be clicked on to view a more detailed report of the specific statement.
2. Statement Description – A quick description of the statement, usually showing the range of dates that the statement covers.
3. Statement Date – The date that the statement was created.
4. Initial Date – The initial date that is covered in the statement.
5. Last Date – The last date that is covered in the statement.
6. Final Balance – The final remaining balance of that statement period.
7. Total Expenses – The total expenses involved in that statement period.
8. Paid – This checkbox is checked once that statement has been paid.
9. Report – This column holds a PDF file icon which can be clicked on to download a PDF version of the statement you click on.
Payments Page
The Payments page within the My Account tab in Shipedge is used to see records of all payments made to add funds into your vendor account within Shipedge for record keeping purposes. You will also see your current available balance, and funds that have recently been added and are being processed and the sum of the two. Below that is a filter for the list of past payments which are organized in the table below with the following headers:
1. Payment Nickname – The nickname that you gave to that specific payment method
2. Payment Type – The payment method type (Example: Credit Card, Checking, etc.)
3. Payment Account Number – The Payment Account Number. If credit card, it will only show the last few numbers for security purposes.
4. Amount – The amount of the payment.
5. Date – The date and time the payment was made.
6. Reference Number – A reference number for that payment.
7. Status – The status of the payment.
8. Last Updated – The last date/time that any updates were made to that specific payment method (Example: last time the payment status was changed from processing to accepted.)
Disputes Page

The Disputes page in the My Account tab in Shipedge is used to view any disputes that the vendor may have filed that the warehouse/shipping carrier have handled or have to handle.
You may view any past disputes by seeing the archived disputes page or filter the current disputes in the table below.
The Three Kinds of Disputes
1. Carrier Insurance – A dispute that is covered under carrier insurance and covered by the shipping carrier.
2. Packing Error Accepted – A dispute that is covered by the warehouse that was accepted to be the fault of the warehouse team.
3. Packing Error Open – A dispute that may be covered by the warehouse and is currently being investigated by the warehouse team to detemine the cause of the issue.
In the table below the columns are split up into the following order:
4. Archive/Remove Column – A column where you can remove/archive current disputes that can be moved into the archived disputes page if they have been taken care of.
5. ID Number – The identification number of the dispute.
6. Report Date – The date that the dispute was created/reported.
7. Shipping Number – The shipping number of the order which is in question in the dispute. This number can be clicked on to open up the orders details page.
8. Claim Amount – The amount/cost of the order in question in the dispute.
9. Dispute Type – The dispute type.
10. Status – The current status of the dispute as discussed in the above section.
11. Problem Description – A quick description of the dispute issue.
12. Warehouse’s Final Comments – Any comments that the warehouse may leave before closing the dispute.
13. Corrective Shipping Number – The new shipping number for sending a new order to correct the dispute, if necessary.
14. Shipping And Handling Charge – The shipping and handling charge for the new order that was shipped to correct the dispute.
15. Closed Date – The date that the dispute was closed/taken care of.