How to Set Up a Shopify Integration
Shopify Steps
1. Login into your Shopify account. Select Apps from the left-hand side menu on your screen.

2. New app options will appear on the search bar. Select App and Sales Channel Settings.

3. Click on the Develop Apps button to create a new app integration.

4. The Create an App now will be available.

5. Name the new app and select a contact name.

Shopify uses the email address to contact the developer if there is an issue with the private app, such as when an API change might break it. This email needs to be linked to someone within the OMS account, so if things change, they can be notified.
6. Once the new app is created you will have this view. Please click on the Configuration tab.

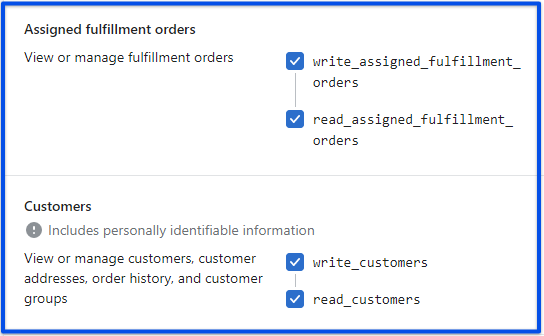
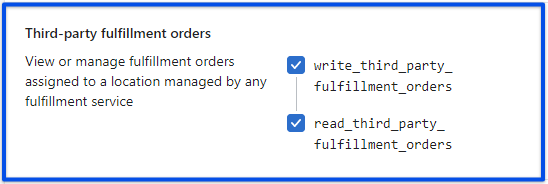
6.1 A list of access scopes will be available. It is very important that the following fields are checked.
Note:
If by clicking the Configuration tab you get this view, click on Edit to access the access scopes list.

• The following must be checked.


 Once finished please install the app. Click the button placed on the upper right corner
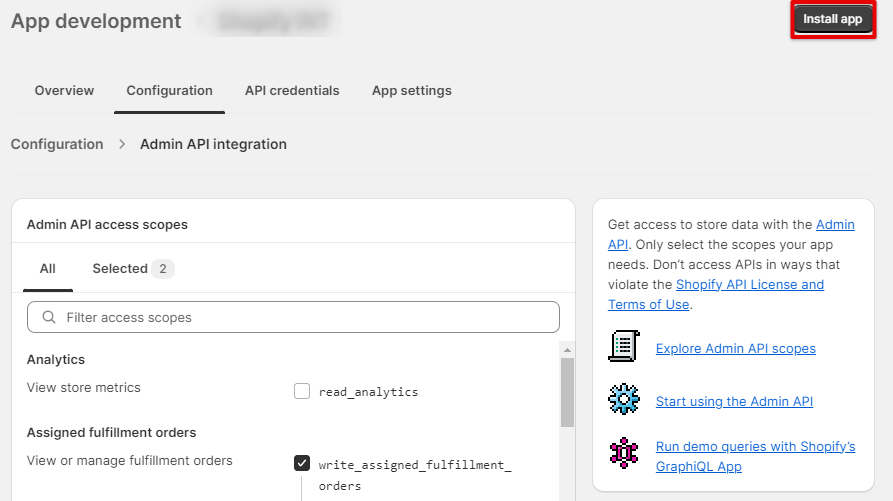
7. After configuring the Access Scopes, click on API credentials.

Copy the Admin API access token and the API KEY as those are needed in the Shipedge configuration.
IMPORTANT NOTE: the Admin API access token is visible only once please save it for your records
Please Note before leaving Shopify:
The products that are handled by Shipedge will require a Location configuration for some processes such as Inventory sync and tracking updates. Please make sure your store has the Locations configuration in place.
Shipedge Steps:
To integrate Shopify with Shipedge, simply go to Shipedge OMS > My Account > Preferences > Channel Automation and look for Shopify.


Click on Shopify.
1. Name your integration. And click on add New Store. An alert will pop-up click on OK.

2. New options will be available. The first will be the Parameters Section.
2.1 The API KEY the one provided in the API credentials section on Shopify will be the API KEY in Shipedge.

2.2 The Admin API access token from Shopify will be your password.
Note: This is the password that Shopify allows you to see only once.

2.3 Hostname, this is where your Shopify store link has to be placed.

You can find the one for your store here.
2.4 Tag, if you have a tag name configured into your Shopify store, you can place it here so only those orders will be pulled to Shipedge. (OPTIONAL)

2.5 Locations, you had to have previously configured the locations in your Shopify store.
Note:
This can also be used to test the connection. If nothing comes up it means that the Admin API access token or the API key have some character missing or they have been misplaced.

3 Orders. Make sure the Orders box is checked.
3.1 The initial date must have the initial date when Shipedge will start pulling orders, please follow the format given.
3.2 Then, you can choose what type of orders you are willing to pull from your Shopify store.
3.3 The Fulfillment email notification, must be checked in order to have an email sent when an order is fulfilled.
3.4 Once completed, click on the Get Orders button.

4. The Update Tracking number must be checked.

Important Considerations:
• In order to have the Update Tracking option work properly the products from your Shopify’s Inventory that are handled by Shipedge need to have the location as same as the warehouse address. (your WMS)

5. Update Inventory
****We highly suggest you do NOT check these two boxes in the Update Inventory section until your SKUs have been received into the Warehouse Management System. This will prevent any discrepancies in your inventory quantities on Shopify.

Important Considerations:
• For Inventory Sync to work properly, the Shopify Integration must be selected in at least one Location.
To do that you need to press the Select location button.
Note:
In most cases, the location is the WMS address. If there are more locations selected the integration will sync the same qty for both.
6. Address Verification, Residential Check, and Ship Method Translator
Hover on the Orders section and then select Integrations. Then, look up the Shopify integration name you set up before.

6.1 Click on the tool icon and check the Address Verification & Residential Check

6.2. Ship Methods and API Errors
As this is considered a new integration some orders may initially come in with an API Error. As they do please be sure to map the ship methods to prevent errors on future orders.
You can also map the Ship Methods by clicking the Checklist Icon and then selecting ShipMethod Translator.

7. Don’t forget to Save your Configuration! Click on the Save Configuration button above the API parameters section.
