Order Status
There are several ways to upload, or get orders, through API (integration), FTP, and CSV (bulk upload), but you can also enter them manually into Shipedge through the online interface. This lesson will explain how to create an order manually.
First, Head to the Orders Screen

Find the “Add Order” link and click it.
Next, Enter Your Customer’s Information

- Add your customer’s email address. (If Ship notification is enabled, we’ll use this email address to send them tracking information as soon as the truck leaves the warehouse.)
- Name of your customer/buyer
- Shipping Address 1. (Note that all fields with * are required and that Address 2 is typically used for suite or unit number, if applicable.)
- Complete the rest of your customer’s shipping address. (Billing address is optional; if left blank, we will use the same address for billing fields.)
- You can include a comment that will appear in the packing slip for the customer and warehouse to read.
- Order # is your own order ID, and it has to be a unique number or value. (To avoid duplicate orders, Shipedge will not accept duplicate order IDs.)
- Up in the right side, you can include your customer’s phone number. (This is required for international or express orders.)
- The Reference # is an additional way for you to identify this order. For example, if this was purchased in your eBay store, you might want to use this field for eBay’s item number.
- Note that you can select optional services provided by the carrier. Please note that not all carriers offer these services, and they charge additional fees associated with them.
- Next, you’ll want to let us know the items included in this order, so click “Add SKU” to go to the next step.
Add Products to Your Order

- To add an SKU to an order, simply search for the SKU or description you need.
- Enter the quantity you want us to ship
- Click “Insert” and repeat the process (go back to Step 1) for each SKU you are adding to the order.
Go to the Next Step or Jump Between Steps

The links (bread-crumbs) at the top of the page indicate how far along the process you are entering an order. Note that you can jump between steps at any time in the process.
- Once you have entered all the products you need, click “Continue” to go to the next step.
Choose the Shipping Method You Want to Use

This screen shows estimated shipping cost for the most common shipping methods. Shipedge will automatically choose the cheapest method for you. Select the shipping method you want to use with your order and click “Continue”.
Verify and Submit Your Order
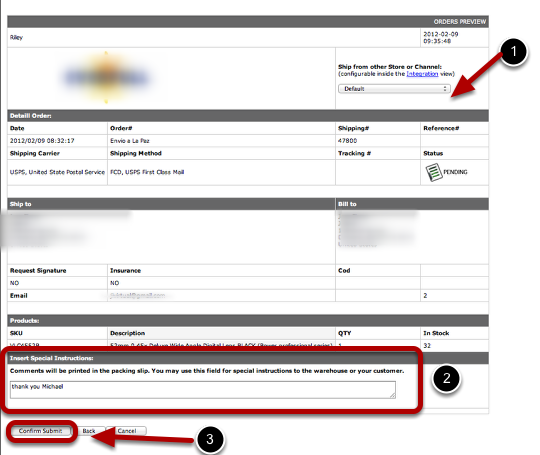
The last step lets you verify your order information. Make sure all the information you have provided is correct.
1. Select the sales channel you want this fulfilled for. The packing list template (including your logo) will change accordingly.
2. You can add a comment to your customer: This comment will appear in the packing list that your customer gets along with their order.
3. Click “Confirm & Submit” and voila! – You are done entering an order.
Your Order is Now in the Queue.
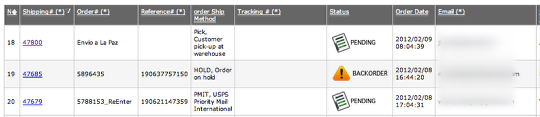
Depending on the availability of your products, your order will enter in status: “Pending” or “Backorder”.Note: Backorders will automatically become Pending and become ready to be processed as soon as you receive product through a Replenishment.